KARGO (pt 5) — Managing custom EKS cluster addons with Flux CD

Audience
In this article, we will describe why we use Flux CD to deploy tooling on EKS clusters. We also scratch the surface on how flux works and how we build a workflow around Flux CD to make sure we don’t break too many things.
Problem
As you saw in the overall architecture article, we provide our customers not an empty EKS cluster, but a cluster with preinstalled addons which make the life of our customers easier.
Managing several clusters by hand takes up a lot of your time and is prone to configuration drift.
So we need a way to automatically install and manage software on multiple EKS clusters so that all clusters are configured the same way and have the same versions installed. The clusters have to become cattle and not pets. Read more about cattle vs pets in this article.
Solutions
The same problem was experienced by other people and two popular solutions were created in the open source tool landscape.
- Argo CD
- Flux CD
We tested both and came to the conclusion that we want to use Flux CD.
Why Flux CD
Before we moved to the cloud we already deployed all our software with Helm and Flux has the feature to deploy Helm charts, so no big changes here. In addition Flux can also deploy plain resource manifests, so all options are available to us.
With Argo CD we would need to establish a new workflow where we render the helm charts for Argo CD to deploy them.
You can also check out a comparison between Argo and Flux in this article.
Cluster ResourceSets for Flux installation
Ok Flux it is, but how do you install it?
Easy, with Argo CD …just kidding.
As we create the EKS cluster with ClusterAPI, we can use ClusterResourceSets to install Kubernetes objects on the newly created cluster.
You can also check the previous article about ClusterAPI
The time this post was written we are installing the following resources with ClusterResourceSets:
- Namespaces
- NetworkPolicies for Kubernetes Addons (additional software needed on every EKS cluster) as they are installed via EKS magic and not a Helm Chart.
- Configmaps for tools which need some cluster specific values (e.g. IP ranges, DNS Domain)
- Flux
Design/Architecture
The Design was inspired form Flux Repository examples.
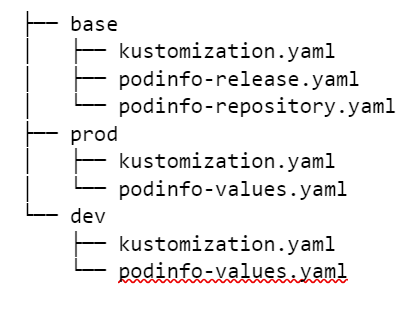
Repository structure
Currently we have two “flavours” of clusters: dev and prod
- The base directory contains HelmRepository and HelmRelease manifests
- The dev directory contains HelmRelease Kustomize patches for deploying pre-releases on the dev cluster
- The prod directory contains HelmRelease Kustomize patches for deploying stable releases on the production cluster
How does Flux work
When bootstrapping Flux, besides the deployments of the Flux tools itself (helm-controller, kustomize-controller, notification-controller, source-controller), a “Secret”, a “GitRepository” and a “Kustomization” object is created which tells Flux to which git repository and which branch to connect to.
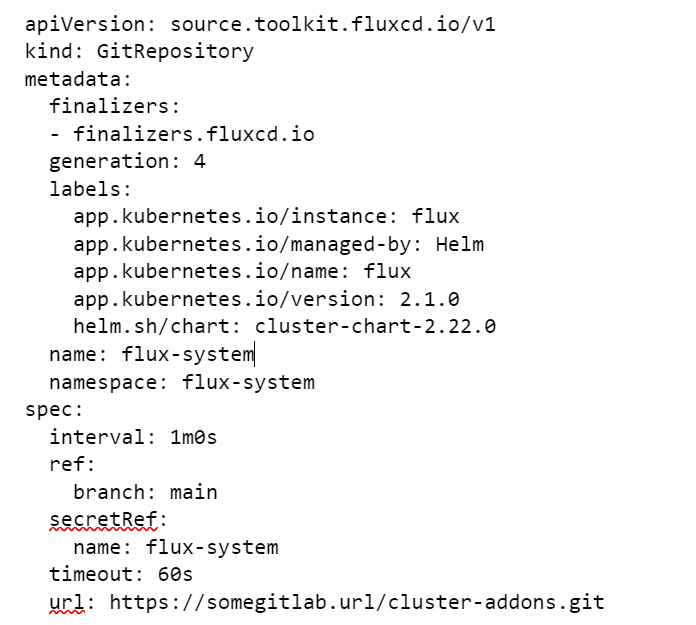
Next you can find the GitRepository Object. Important parts are the “URL” of your GitRepository, the “branch” of your GitRepository flux has to use (this will be handy when testing new releases of tools installed by flux) and the “secretRef” which is a secret containing a token for your git repository.
❯ kubectl get gitrepository flux-system -n flux-system -oyaml
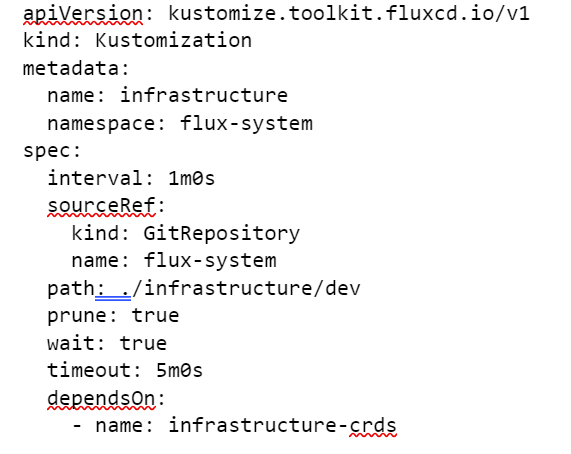
Here is an example of the “Kustomization” object telling Flux which path/directory in your git repository to use. This is used to differentiate clusters between “dev” and “prod”.
❯ kubectl get gitrepository flux-system -n flux-system -oyaml

Flux then reads the relevant directories and files. In this example, Flux connects to the directory clusters/dev. There it reads the 4 yamls (apps.yaml, infrastructure-basics.yaml, infrastructure-crds.yaml, infrastructure.yaml)
We concentrate on “infrastructure.yaml” and how “cert-manager” is installed. This is a shortened example.
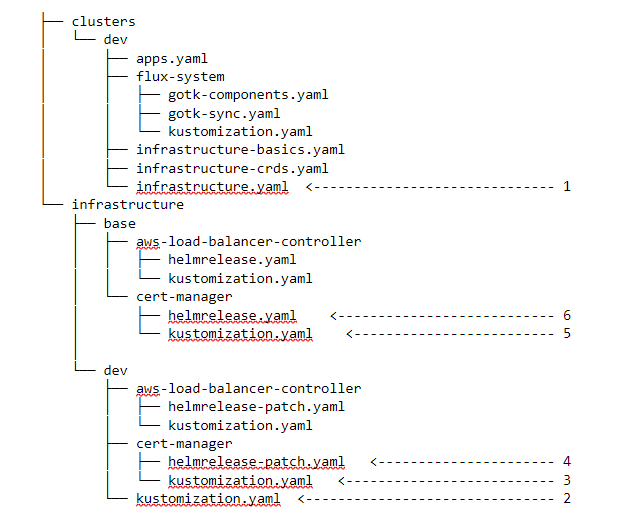
Step 1, infrastructure.yaml. This tell Flux to go to “infrastructure/dev”
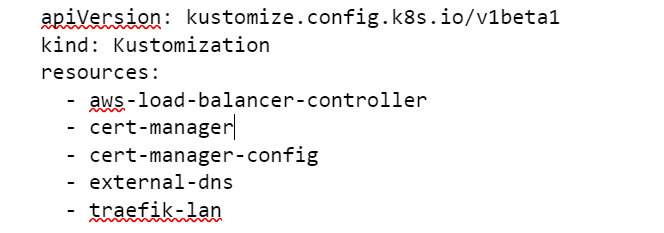
Step 2, kustomization.yaml, as “infrastructure/dev” is a directory, Flux looks for a file named “kustomization.yaml”, in this file other directories/resources are defined. We concentrate on “cert-manager”, but the same happens to all resources.
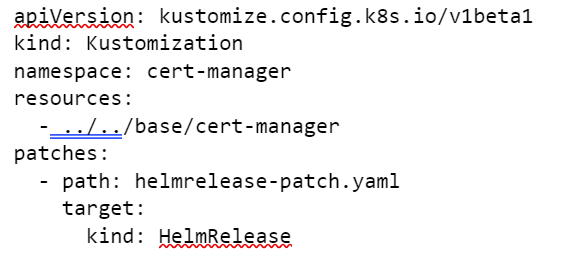
Step 3, kustomization.yaml in the cert-manager directory. Again, as “cert-manager” is a directory Flux looks for the “kustomization.yaml”. In this file we tell Flux to look for resources in “../../base/cert-manager” directory, but also apply a patch to this resources from the file “helmrelease-patch.yaml”
Step 4, helmrelease-patch.yaml. This tells Flux to override the helm chart version of the cert-manager (form step 6). This is handy to run a different version in the dev cluster compared to the prod cluster.

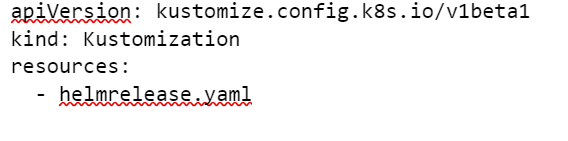
Step 5, kustomization.yaml in the cert-manager directory. Again, as “cert-manager” is a directory Flux looks for the “kustomization.yaml”. This tells Flux to look for a file/resource named “helmrelease.yaml”
Step 6, helmrelease.yaml. And finally we tell Flux what to install. You can see we define values files, and also using a ConfigMap to build up the needed values fo Helm. The ConfigMap “cert-manager-values” was placed in the kube-system namespace by the ClusterAPI using ClusterResourceSets. As you see, we do not define any version. The version is patched in from “Step 4”.

Dependencies
Dependencies can become tricky as you cannot define dependencies between all objects.
As far as I understand you can define dependencies between Helm charts or between Kustomizations but not between Helm charts and Kustomizations.
As an example, in “Step 1” you can see that “infrastructure” is depended on “infrastructure-crds”. Both are “Kustomizations”. So this way we force Flux to install all crds first, and then everything which is in “infrastructure”
In “Step 6” we have a dependency on “aws-load-balancer-controller” which is a Helm dependency. Flux will first install the “aws-load-balancer-controller” before installing the “cert-manager”.
Our Workflow
It took us some time to come up with a workflow which is not too elaborate but also not too prone to brake something. Also we don’t have any fancy testing frameworks in place (yet), which would simplify the workflow, so we have to do the testing by hand.
If we want to add or update something installed by Flux, we use the following Steps:
- Create a new branch in the repo Flux is reading.
- Spin up a test cluster and connect it to the branch (k edit gitrepository flux-system -n flux-system) (test clusters already use the “clusters/dev” path)
- Make changes in the “dev” directories (e.g. change the version of a helm chart “See Step 4”)
- Push changes
- Check what Flux is doing (“k get helmrelease -A”, “helm ls”, “k get pods”, …)
- If all is good, let someone merge it. This will cause the dev cluster (which is always running, and attached to the “main” branch) to install the new versions.
- Check if the dev cluster is also OK.
- Create a new branch as a followup to the previous branch, and redo what you did to the “dev” part in the “prod” part.
- Let someone merge it, it will now be rolled out on all “prod” clusters.
Tipps
To see what is happening you can use flux get all -A, this will show all the resources Flux is using and their status.
When something takes too long, or you fat fingered (make a typo) something up in the Helm chart, you can use some Brute Force IT™. Just delete the flux pods which will force Flux to recheck everything. Also as the source-controller acts as a source for the Helm charts, this forces a redownload of all Helm charts from the registry. The Helm charts are pulled from the registry, repacked, and made downloadable in the cluster. This repacked version is then installed by the helm-controller.
If you have some changes in the Helm chart that cannot be upgraded (e.g. changes in matchlabels section), you can instruct flux to uninstall the Helm release on failure, and do a fresh install. But this should only be done if you exactly know what will happen, having this on by default, could result in a unfavorable behaviour. For example you are trying to install a new version but the new version is broken and will never work then this would uninstall the working version and you end up with nothing running. Check “Step 6” for the right place for this.

Conclusion
Flux CD assures that all EKS clusters are configured the same way and there is no configuration drift. We can deploy the tools with helm charts, which we already had. We can also deploy plain resources if a need arises. The possibility to define dependencies helps preventing installation or upgrade errors. It provides an easy way to manage a fleet of clusters in a single repository. We can easily divide the clusters into more flavours when the necessity arises.
More about KARGO
- KARGO (pt 1) — Moving up the stack
- KARGO (pt 2) — A container focused developer platform on AWS
- KARGO (pt 3) — Exposing workloads on EKS
- KARGO (pt 4) — Create Kubernetes cluster at scale with ClusterAPI
- KARGO (pt 5) — Managing custom EKS cluster addons with Flux CD
